An existing tool often gets you most of the way to what you need. The missing part might be a different set of controls, a smaller interface, or a simple workflow that fits your own routine.
Aelrox AI Builder lets you describe a small desktop tool, preview the result, and improve it with specific feedback. The useful starting point is a concrete task: what you enter, what the tool should show, and what you want to happen next.
You can use existing community micro apps whenever they already solve the problem. Builder becomes valuable when you can explain the part you want to make your own.
Choose a task small enough to explain clearly
A personal checklist is a good example of a focused request. It needs an input, a visible result, and a small number of actions. You can decide whether it works by using it for a real task.
For a tutorial or release workflow, the input could be a short list of things to finish. The result could be a compact desktop checklist with completed and remaining counts. The tool should remember the list when reopened and ask before clearing completed items.
That description is more actionable than asking for an entire productivity system. It gives you a useful first result to inspect before adding more features.
Describe the behavior you want
Open Aelrox Builder and include the task, the important controls, the output, and any data-handling requirement. Here is a starting prompt you can adapt:
Create a compact English desktop checklist called Launch Checklist. Let me add, edit, complete, and delete tasks, show completed and total counts, and filter All, Open, or Done. Include three sample tasks: Check the demo, Capture a screenshot, and Review the release notes. Remember tasks after reopening. Keep data local and do not use network access. Ask for confirmation before clearing completed tasks.
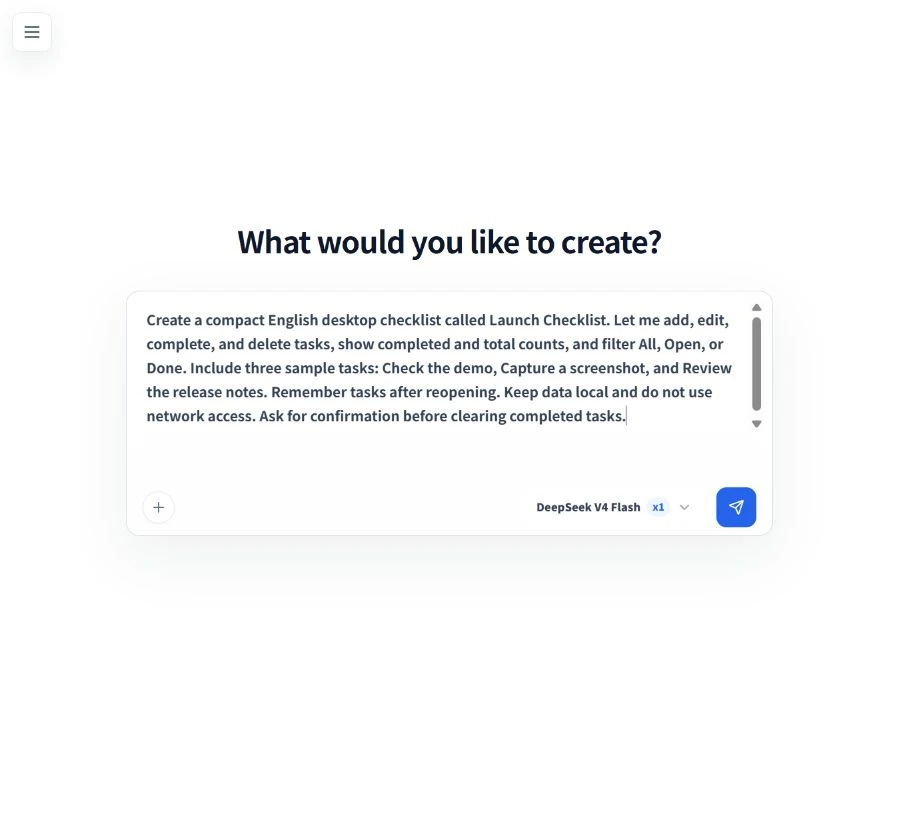
The starting request in Builder. The following images show the checklist generated from this request after choosing E-Ink / Paper.
Change the name, sample tasks, and appearance to fit your work. A short specification is useful because you can compare each part with the eventual result. For this walkthrough, we submitted the prompt above, chose E-Ink / Paper when Builder asked about the visual style, and generated Launch Checklist v1.
Avoid including private project information when an ordinary sample will explain the requirement. A generic task such as “Review the release notes” is enough to demonstrate the behavior.
Inspect what the first version actually does
After a successful generation, use the preview as a working tool. For a checklist, add a task, edit it, mark it complete, and compare the counts. Switch the filters. Try an empty list and an empty input as well as the normal path.
The first useful question is whether the main action works clearly. Styling can be refined later. A compact, understandable tool that remembers the right information is a stronger starting point than a polished screen with ambiguous behavior.
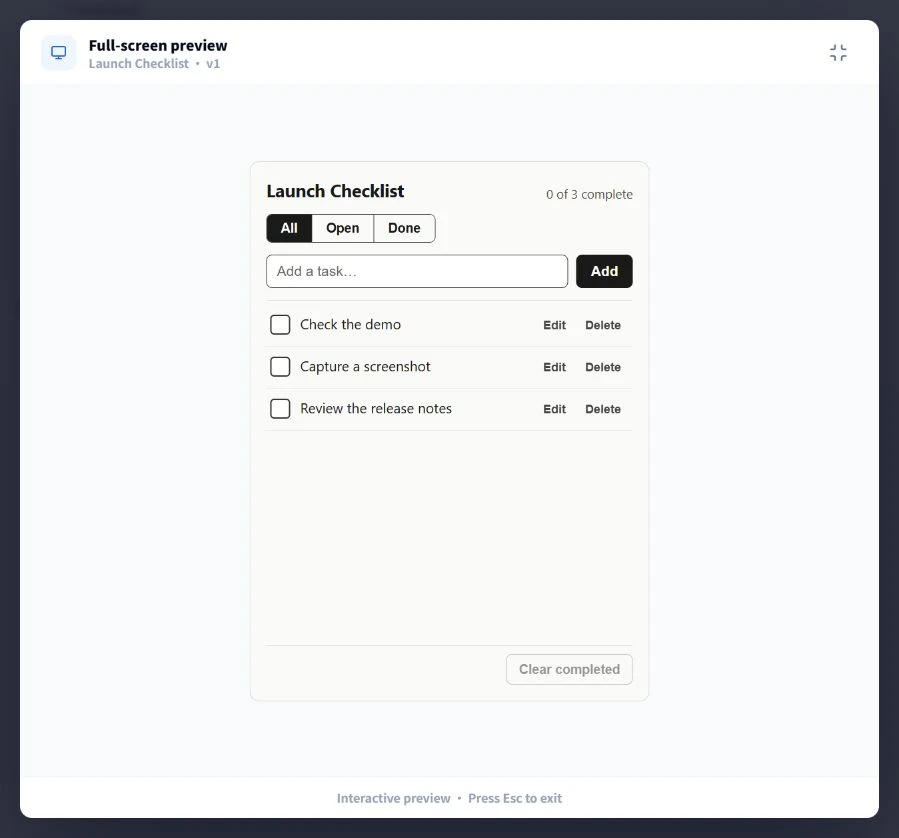
The actual first Launch Checklist version in Builder browser preview, with the three requested sample tasks and All, Open, and Done filters.
The generated version shown here starts with the requested three sample tasks. It has an input for new tasks, edit and delete controls, a completion count, and the three filters. The restrained paper style keeps the task text and actions easy to distinguish.
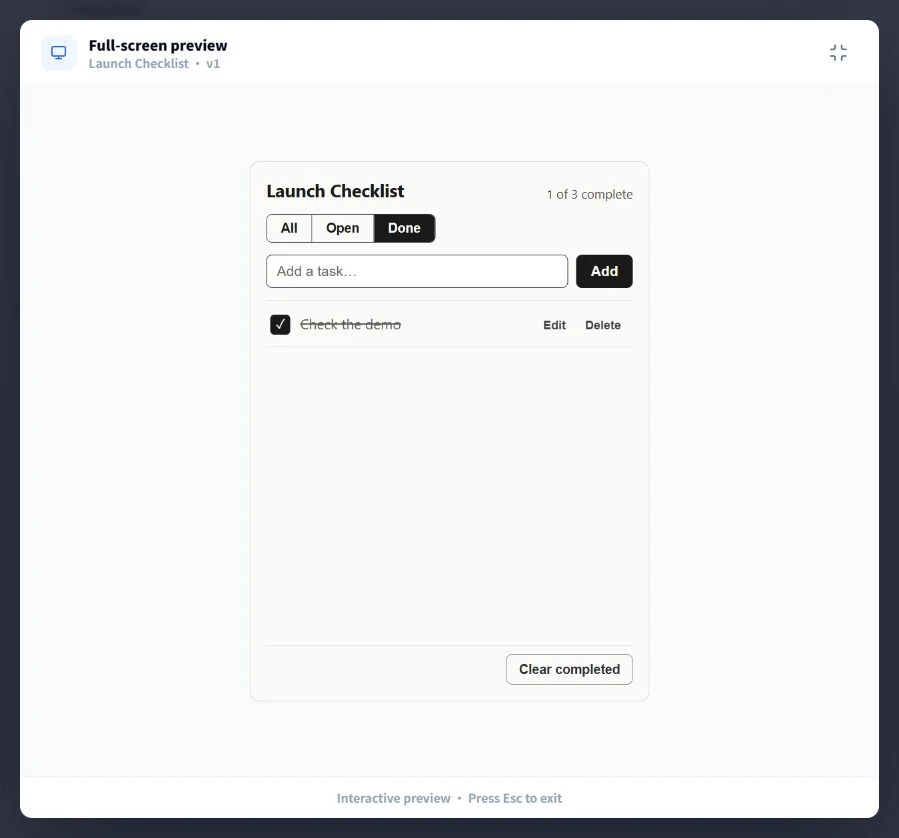
After marking Check the demo complete, Done shows that task and the count reads 1 of 3 complete.
We marked Check the demo complete and selected Done. The preview showed just that completed task, while the header changed to 1 of 3 complete. Selecting All returned to the full list. These are actual interactions with the generated preview.
The screenshots in this article are from Builder's browser preview. They demonstrate the visible checklist behavior; they do not establish desktop persistence. Treat closing and reopening the installed desktop tool as a separate check before relying on saved tasks.
Give feedback about one observable change
Useful feedback names the current behavior and the result you want. For the checklist example, a follow-up could be:
When I choose Clear completed, show a confirmation with the number of completed tasks. Cancel must keep every task unchanged. Confirm should remove only completed tasks and keep open tasks and their order.
This gives the next version a clear behavior to satisfy. You can repeat the same action in preview and see whether the change is correct.
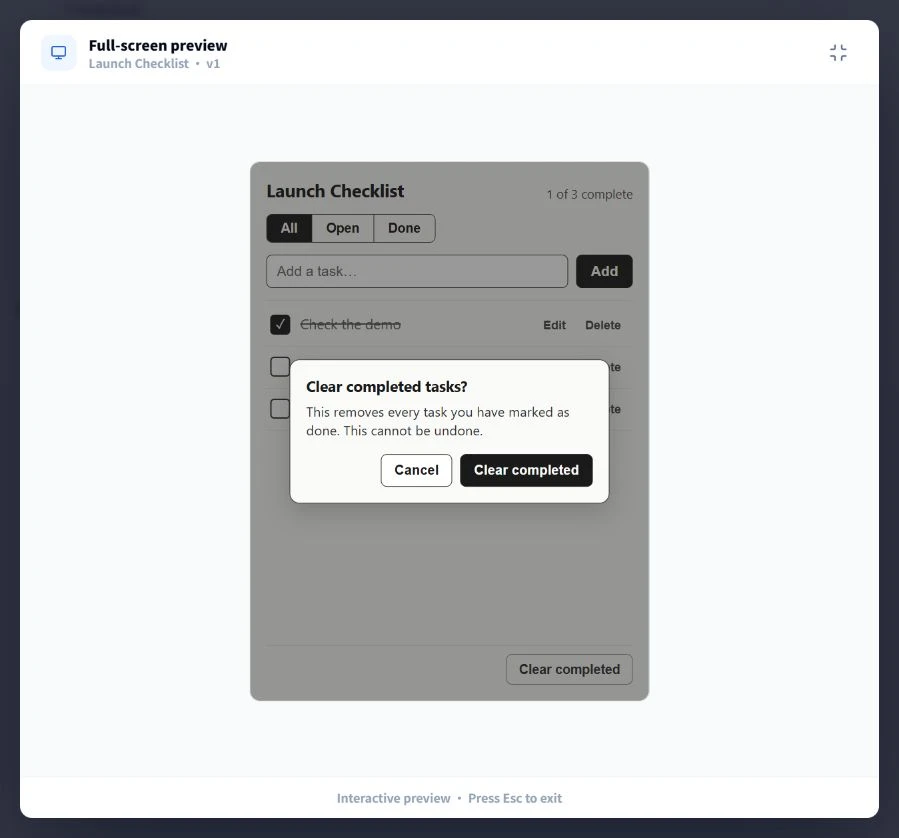
The generated clear-completed confirmation. Cancel was used in this walkthrough, retaining the completed task.
The generated confirmation already offers Cancel and Clear completed and explains what clearing removes. In this walkthrough, choosing Cancel kept the completed task in the list. Asking it to include the number of affected tasks would be a specific refinement to this version, rather than a request to invent the whole interaction again.
You can use the same method for appearance: specify which part should be smaller, which text needs more contrast, or which control should remain visible. Avoid requesting several unrelated redesigns at once if you want to understand what changed.
Take the useful version to the desktop
A browser preview is a useful place to inspect the interface. The desktop client is where you check how the tool fits your actual working environment.
Use the available open or installation action for the saved tool and run it in Aelrox. Review any permissions it requests. Place its window beside your main application and repeat the important actions there.
For a tool that promises persistence, save recognizable sample content, close and reopen it, and confirm that the expected information remains. For a tool that creates a file, inspect the exported file. Those checks connect the original request to a result you can use.
You can then reach the installed tool through Aelrox's launcher and organize it with the rest of your workspace. If it is useful to others, prepare an accurate description and follow the publishing and review process.
Keep a working version as you improve it
Save a usable stage before making a larger change. Describe the change in ordinary terms, such as “add clear-completed confirmation” or “remember the selected filter.” That makes the versions easier to understand later.
If a result misses part of the task, reduce the scope of the follow-up and name the behavior you want to change. For a second example of this process, the Pomodoro improvement walkthrough follows changes to a timer's controls and reset behavior.
The goal is a tool you reach for because it matches your work. Start with one repeated task, use the first working version, and let actual use guide the next improvement.
Open Aelrox Builder and describe one small tool you wish you had on your desktop.